Making Android Widget with Buttons : In my previous post I explained how you can make your first android widget with few simple steps and making an Android widget with a single button. In this post I’ll explaining, how to create an android widget with several buttons and implement on click listeners for widget buttons.
Making Android Widget with buttons :
To start creating follow this steps :
Step 1 : Creating the project.
Make a new android project with package name : parallelcodes.simplewidget and with name : SimpleWidget. You can always use your own desired package name and application name.
Used : Android Studio
Minimum Required SDK : API 8 – Android Froyo
Target SDK : API 19 – Android Kitkat.
Step 2 : Creating widget provider XML file.
2.1 – Make a new folder named xml in your res resource folder “res->xml”
2.2 – Create a new xml file in the newly created xml folder with name : mywidgetprovider.xml
“res->xml->mywidgetprovider.xml”
This file will be providing the reference to our widget to our layout file or you can say design file, after creating the mywidgetprovider.xml file, please edit it as following code of lines.
mywidgetprovider.xml:
<?xml version="1.0" encoding="utf-8"?>
<appwidget-provider xmlns:android="http://schemas.android.com/apk/res/android"
android:initialLayout="@layout/activity_main"
android:minHeight="146dp"
android:minWidth="146dp"
android:updatePeriodMillis="0" >

</appwidget-provider>
This file defines the xml layout info of our application widget.
Step 3 : Creating the layout of our widget.
By default the activity_main.xml layout file will be created in your res->layout folder. If it is not created, please create one and edit it as following :
res->layout->activity_main.xml :
<?xml version="1.0" encoding="utf-8"?>
<LinearLayout xmlns:android="http://schemas.android.com/apk/res/android"
 xmlns:tools="http://schemas.android.com/tools"
 android:layout_width="wrap_content"
 android:layout_height="wrap_content"

 android:orientation="vertical"
 android:background="#fff" >

 <TextView
 android:id="@+id/textView"
 android:layout_width="wrap_content"
 android:layout_height="wrap_content"
 android:layout_centerHorizontal="true"
 android:padding="5dp"
 android:text="Hello there"
 android:textColor="#525252"
 android:textSize="25dp" />

 <LinearLayout
 android:layout_width="wrap_content"
 android:layout_height="wrap_content"
 android:orientation="horizontal"
 android:padding="2dp" >

 <Button
 android:id="@+id/btnGoogle"
 android:layout_width="wrap_content"
 android:layout_height="wrap_content"
 android:layout_margin="2dp"
 android:text="Google" />

 <Button
 android:id="@+id/btnStackOverFlow"
 android:layout_width="wrap_content"
 android:layout_height="wrap_content"
 android:layout_margin="2dp"
 android:text="Stackoverflow" />
 </LinearLayout>

 <LinearLayout
 android:layout_width="wrap_content"
 android:layout_height="wrap_content"
 android:orientation="horizontal"
 android:padding="2dp" >

 <Button
 android:id="@+id/btnToast1"
 android:layout_width="wrap_content"
 android:layout_height="wrap_content"
 android:layout_margin="2dp"
 android:text="Toast 1" />

 <Button
 android:id="@+id/btnToast2"
 android:layout_width="wrap_content"
 android:layout_height="wrap_content"
 android:layout_margin="2dp"
 android:text="Toast 2" />
 </LinearLayout>

</LinearLayout>
When you launch widget, a simple Text message will be shown on your home screen. And on clicking on the buttons, it will open the website links and show toast messages on screen.
After making the layout, our widget will look like below image :
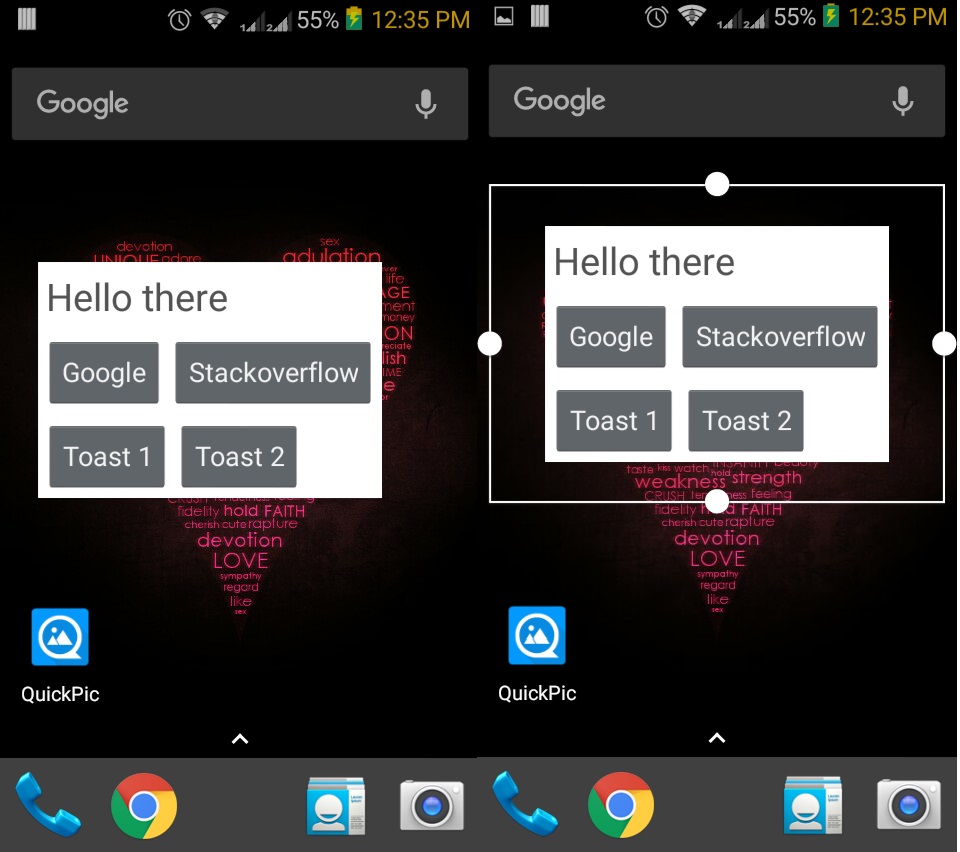
Making Android Widget with several buttons – Layout design
Step 4 : Coding the application.
Inside your project, under the src folder make a java class file with name WidgetActivity.java . src>Packagename>WidgetActivity.java (your package name) and edit it as following
WidgetActivity.java :
package parallelcodes.simplewidget;

import android.app.PendingIntent;
import android.appwidget.AppWidgetManager;
import android.appwidget.AppWidgetProvider;
import android.content.ComponentName;
import android.content.Context;
import android.content.Intent;
import android.net.Uri;
import android.widget.RemoteViews;
import android.widget.Toast;

public class WidgetActivity extends AppWidgetProvider {

 private static final String strGoogle = "Open Google";
 private static final String strStack = "Open Stack";
 private static final String strToast1 = "Toast1";
 private static final String strToast2 = "Toast2";

 @Override
 public void onUpdate(Context context, AppWidgetManager appWidgetManager,
 int[] appWidgetIds) {

 ComponentName thisWidget = new ComponentName(context,
 WidgetActivity.class);
 int[] allWidgetIds = appWidgetManager.getAppWidgetIds(thisWidget);

 for (int widgetId : allWidgetIds) {

 RemoteViews remoteViews = new RemoteViews(context.getPackageName(),
 R.layout.activity_main);

 remoteViews.setOnClickPendingIntent(R.id.btnGoogle,
 getPendingSelfIntent(context, strGoogle));
 remoteViews.setOnClickPendingIntent(R.id.btnStackOverFlow,
 getPendingSelfIntent(context, strStack));
 remoteViews.setOnClickPendingIntent(R.id.btnToast1,
 getPendingSelfIntent(context, strToast1));
 remoteViews.setOnClickPendingIntent(R.id.btnToast2,
 getPendingSelfIntent(context, strToast2));

 appWidgetManager.updateAppWidget(widgetId, remoteViews);
 }
 }

 protected PendingIntent getPendingSelfIntent(Context context, String action) {
 Intent intent = new Intent(context, getClass());
 intent.setAction(action);
 return PendingIntent.getBroadcast(context, 0, intent, 0);
 }

 @Override
 public void onReceive(Context context, Intent intent) {
 super.onReceive(context, intent);
 if (strGoogle.equals(intent.getAction())) {
 Intent intent2 = new Intent(Intent.ACTION_VIEW);
 intent2.addFlags(Intent.FLAG_ACTIVITY_NEW_TASK);
 intent2.setData(Uri.parse("http://www.google.com"));
 context.startActivity(intent2);

 } else if (strStack.equals(intent.getAction())) {
 Intent intent2 = new Intent(Intent.ACTION_VIEW);
 intent2.addFlags(Intent.FLAG_ACTIVITY_NEW_TASK);
 intent2.setData(Uri.parse("http://www.stackoverflow.com"));
 context.startActivity(intent2);
 } else if (strToast1.equals(intent.getAction())) {
 Toast.makeText(context, "Hey hi!", Toast.LENGTH_SHORT).show();

 } else if (strToast2.equals(intent.getAction())) {
 Toast.makeText(context, "How are you?", Toast.LENGTH_SHORT).show();

 }
 ;
 }
}
Step 5 : Editing the Manifest file.
Now finally open the Android manifest file and edit it as following :
AndroidManifest.xml :
<?xml version="1.0" encoding="utf-8"?>
<manifest xmlns:android="http://schemas.android.com/apk/res/android"
 package="parallelcodes.simplewidget"
 android:versionCode="1"
 android:versionName="1.0" >

 <uses-sdk
 android:minSdkVersion="14"
 android:targetSdkVersion="14" />

 <application
 android:allowBackup="true"
 android:icon="@drawable/ic_launcher"
 android:label="@string/app_name"
 android:theme="@style/AppTheme" >
 <receiver
 android:name=".WidgetActivity"
 android:icon="@drawable/ic_launcher"
 android:label="0005656asd" >
 <intent-filter>
 <action android:name="android.appwidget.action.APPWIDGET_UPDATE" />
 </intent-filter>

 <meta-data
 android:name="android.appwidget.provider"
 android:resource="@xml/mywidgetprovider" />
 </receiver>
 </application>

 <uses-feature>
 </uses-feature>

</manifest>
Now we can run our application. Let’s see a demo video of the application we just created :
This post was made possible after googling around for few days to find answers for creating widgets with buttons on it and implementing button click listener on widgets. I was able to develop this application by answers on several stack overflow links. So here are the links to it :
- Button click event for android widget
- Android widget onclick listener for several buttons
- how to present a toast when a widget is clicked?
- How to implement a Button on an Android Widget
Thank you and stay Happy.